Event Setup
2 - 12 months from event
Auction & Guest Management
1 week - 2 months from event
Landing Page Builder
Create your main event landing page with HelloFund.
How to Access Landing Page Builder
-
Go to Event Admin
-
Select Software Settings
-
Click Landing Page Builder
Settings
Software Settings > Landing Page Builder
Click the black Settings button in the top-left corner, then review each section one by one.
Open Auction Early? No
Software Settings > Landing Page Builder > Settings Button > Page Settings
Add brand colors and page font.
-
Add Brand and Secondary colors.
-
Set the Page Font (recommended: Montserrat).
-
Enable Show Item Share Button: Yes.
-
Enable Show Watch Item Button: Yes.
TIP! Not sure about brand colors? Drop an image to Adobe Color to grab exact hex values.

Software Settings > Landing Page Builder > Settings Button > Navigation
Settings for Tickets, Auction, Donate and Sponsors link in side menu.
When selling tickets and sponsorships, we recommend:
-
Show Tickets Link? No
-
Show Auction Link? No
-
Show Donate Link? No
-
Show Sponsors Link in Side Menu? No
Why?
Later, you’ll be able to add dedicated buttons that highlight Tickets, Sponsorships, and Donate, which creates a cleaner layout and a better overall user experience.
Software Settings > Landing Page Builder > Settings Button > Hero Banner
Use this to enhance your landing page.
Recommendations when selling tickets and sponsorships
-
Hero Banner: recommend Hero 6
-
Hero Logo: recommend not adding
-
Hero Background: 1920 x 1080 px [Canva Template]
-
Show Hero Button? No
Suggested Image sizes for Logo and Hero Banner
Background: 1920×1080px or 1024×576px
Logo: 200×200px
Note: These are recommendations based on testing for optimal display across devices. We encourage you to experiment with different sizes to achieve your desired look and feel. The visual impact of your imagery may vary depending on your specific design goals and content.
TIP! Make a copy of our Canva link to customize your Hero Banner.
Software Settings > Landing Page Builder > Settings Button > Footer Settings
Add your primary support email along with your Facebook, Twitter, and Instagram URLs, plus your Google Analytics ID.
Need inspiration? Tap the images to spark ideas for your next event or fundraiser.


Software Settings > Landing Page Builder > Add Action Bar Link
Use these to create action buttons like Sponsor, Buy Tickets, or Donate.
To add an action bar link or button, follow these steps:
-
Click Add Action Bar Link
-
Select a Type (e.g., Sponsorships under Tix at the bottom of the page)
-
Search for and choose an Icon
-
Enter a Button / Action Bar Link Title
-
Click Save
-
You can add up to three buttons or action bar links

Software Settings > Landing Page Builder > Add Content Block
Use this to add sections to your main event landing page. You can include any of the following:
Free-Form (HelloFund Favorite!)
Software Settings > Landing Page Builder > Add Content Block > Select Free-Form
Free-Form lets you add text, images, videos, and buttons, giving you the most customization for each section.
Add an Image, Video or Button
-
Click the + icon in the bottom-left corner of the Free-Form section
-
Select the appropriate icon (image, camera/video, or link)
-
Upload or add your content
Image Tips
-
Use PNG or JPG files for best results
-
Make sure images are properly sized before uploading
-
IMPORTANT: Save images using the recommended naming format
(Example: SponsorshipOpportunities)
Video Tips
-
Paste a video link (YouTube is recommended)
-
The video will automatically display correctly on your event landing page
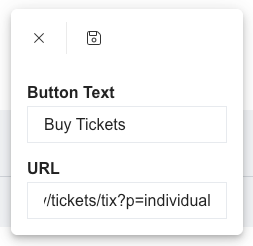
Button Tips
-
Click the + icon and select the Link button (quick insert)
-
Select the link icon
-
Enter your Button Text and URL
(Example: https://hellofund.io/app/public/bidapp/diy/tickets/tix?p=individual) -
Click the Save (floppy disk) icon
Recommendations for Using Free-Form
Use Free-Form to add:
-
Event Details
-
Schedule
-
Questions / FAQs
-
About / Mission content

Auction Items
Software Settings > Landing Page Builder > Add Content Block > Select Auction Items
Add auction items to your main event landing page. We recommend doing this once your auction setup is nearly complete and before you begin marketing to your community.

Cumulative Total Bar
Software Settings > Landing Page Builder > Add Content Block > Select Cumulative Total Bar
Add a cumulative total bar to highlight your fundraising goal and show donors your progress throughout the event or fundraiser.
Cumulative Total Bar setup:
-
Choose a background color for the section
-
Select which funds to display (e.g., donation items only or all event revenue)
-
Set your fundraising goal (for example, $100,000)
-
Add a buffer to account for offline donations, if needed
-
Select your bar color
This progress bar appears on your event landing page and shows donors how close you are to reaching your goal — motivation included at no extra cost.


Featured Items
Software Settings > Landing Page Builder > Add Content Block > Select Featured Items
Add a section to highlight specific or featured items, such as a Live Auction Preview.
Featured Items settings:
-
Choose a background color for the section
-
Select the alignment (Left, Center, or Right)
-
Choose the items to display (e.g., Under the Tuscan Sun)
-
Click Save

Sponsors
Software Settings > Landing Page Builder > Add Content Block > Select Sponsors
Use Sponsorship Levels (Groups) — such as Title Sponsor, Gold Sponsor, or Silver Sponsor — to organize and display sponsors clearly across your event and auction pages.

To update Sponsor Logos, go to Software Settings > Sponsors. Here you can add different levels / groups like Title Sponsor, Technology / Auction Sponsor, etc.
